A small update….

•February 17, 2017 • 1 Comment

So….it’s been many a year since I managed to get a blog post together! Since then life has gone on. I’m with expanding family and Nick is now owner and skipper of a lovely Reliant 49 (Rogue Trader) and sailing it around the Caribbean after a long ARC crossing.

Our poor old Etchell is still mid ‘project’. However, there where a number of bits of progress in 2012/2013 that I’ll aim to upload over the coming days so that anyone interested can see a little more of the progress.

There seem to be a few people working on similar projects out there so it would be great to hear a little more about these and see what progress has been made and what the different approaches are.


Building the Cabin top

•November 8, 2011 • 3 Comments

Here is a bit of a summary of progress so far with building our cabin top for the Etchell. We spent quite a bit of time agonizing over the smallest of angles and curves that would make up the cabin top shape. It’s amazing what a difference changing these details can have on the overall form. Eventually we settled on a final form and using Rhino 3D modeled this up in order to extract enough detail to construct a former for the cabin top.

Our approach to this cabin top is to build a male former, then tack on foam core and apply layers of glass on the outside. We would then remove the former and apply glass on the inside. We will need to do quite a bit of finishing on both sides – but it saves us from having to make a very high end former.

The former was constructed using MDF board and some left over strips of Western Red Cedar that we had lying round from an earlier project. We were able to get sections from the CAD drawing and then mark and cut these in the MDF. The Cedar strips where then curved around the edge to support the foam.

Here are some pics showing the former constructed and ready to apply the layer of foam.

After building the former we applied the layer of foam. This is really nasty dusty stuff but Nick assures me it has splendid structural qualities.  We put down a layer of resin proof tape at any contact points and then held down the foam with small panel pins and the occasional screw. The aim being to have minimal disruption to the foam core when we remove the inner former.

With all the foam on we applied a layer of resign proof tape for the mast and cabin door cutouts. Here are a few shots of the foam ready for applying the outer layers of glass. The indent around the edge will house a wooden rail.

With the foam on we then applied a 2 layers of combination (chop and weave). It was a tricky job to make sure that there where no air pockets in between the foam and the outside layer. Here is a fairly blurry shot of the top layer on.

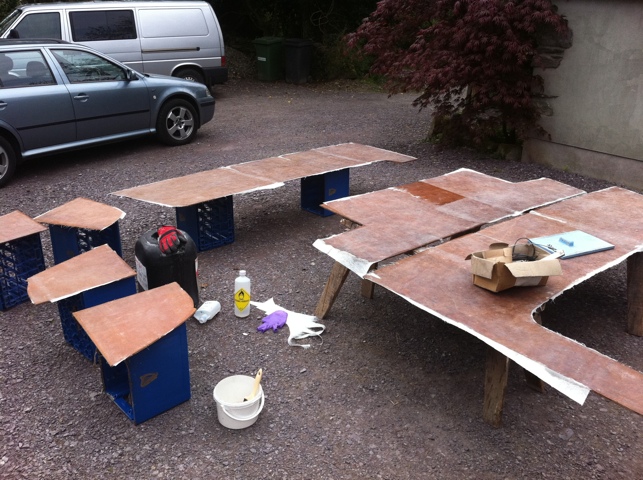
With the outside layer on we then flipped the piece upside down and stripped out the former. We then cut out the holes for the mast and cabin door. The resin proof tape worked a treat here. The only tricky bit was making sure the holes where properly lined up. Thankfully the tape gave a clear indicator of the outline of the 2 holes. The edges are cut at angles to improve the structural integrity of the form – or so Nicky tells me.

At this stage the shape was still quite flexible. The real advantage of this sandwich construction only comes with application of layers on both sides of the foam. In order to make sure that the original curves of the former were preserved, we build a female frame work around the base of the unit. This kept the sides from sagging and made sure the piece was nice and secure whilst applying the inside layers of glass. Here are a couple of hazy shots of the glassed interior guarded by our mannequin 🙂

So – thats the progress on the cabin top. I’d dearly love to have it fitted on the boat at this stage – but it seems this project will be a slow burner. Still – progress is progress and we keep ticking of the tasks.

In the meantime – Nick has made great progress on the hull. Half our boat is in a gleaming, if slightly patchy, Mauritius Blue. More on that to follow!

More boat progress

•May 9, 2011 • 2 Comments

Well it’s been a while since I’ve udpated this and we’ve managed to make some pretty solid progress since. Here’s a few shots…

Here are the floor supports with a fillet of fiberglass/filler to position them. The jig makes sure the are all on the same plane..hopefully!

These where followed by the main bulkhead. This hasn’t been cut to shape at the top – which should give us a bit of play when the cabin form is made up. With this in, we could really get a sense of the cabin space and also the cockpit.

Oh, also noticed – this shot shows the seat supports in place for the cockpit.

Next step was to glass up and position some L sections for the cabin. These will provide a starting point for putting in any furniture for the cabin.

In the image above the left section is tabbed in, with the right section about to be glassed in too.

After much sanding down and glassing the internal area was ready for its first gel coat. Nice to see it neatened up a bit!


And so some decent progress…but unfortunately we are dragged back to our day jobs and so things may slow a little for a while! Still there are plans to construct the cabin top away from the boat. Hopefully this will see a bit more progress…fingers crossed!

Jig for cabin floor supports

•April 23, 2011 • 1 Comment

Working on the cabin floor supports. This jig should keep the ply/resin pieces aligned when placed in the floor

20110423-012244.jpg

Starting the cockpit

•April 21, 2011 • 1 Comment

A long day of sanding and laying glass. The seating boards are in and ready to be tabbed in place.

20110421-054606.jpg

20110421-054714.jpg

Laying glass on seat panels

•April 21, 2011 • Leave a Comment

20110421-122600.jpg

Some more progress on the double berth

•November 30, 2010 • 2 Comments

Here are some more snaps of continued work on the double berth. We’re keeping two storage areas beneath the end of the berth. These will have easily removable lids. The other 3 holes will be sealed with airtight removable lids. These will give us some more buoyancy.  The gab in the centre is for mast.


We also started the bulkhead that will separate the cockpit and the cabin.

This will allow us to remove the existing seat and get to work on further fittings for the hull. More to come soon!…


Prep work for the spacious ensuite

•November 12, 2010 • 1 Comment

So, here are some snaps from earlier in the summer.

After cutting out the front bulkhead, we put in another further forward. This is pretty much in the same space as advised for newer etchells. We have cut the hole in the bulk head to match the existing door from the previous bulkhead. (Nic did a great job of spilling a litre of resin inside – so hence the hasty glassing job. Still…fair play to him for glassing in that little den of misery)

So anyway, this gave us plenty of room for a double berth – a fair bit of optimism here! it will be a space to sleep at least.

We have put in supports as you can see from the images below. These bring more stability to the hull and will also act as either storage or be sealed of for buoyancy.

We have built around where the mast slots in and also allowed holes for ropework to travel through. The tabs you see will support the bed base.

Here, the front section of the bed is being weighed in place by some blocks, with Tabs being glued and held with clamps.

More shots to follow with the bed in place.


Chopping up the hull…

•April 2, 2010 • 3 Comments

So, we’ve been removing even more of our boat over the last 2 days. The angle grinder and jigsaw have been seeing lots of use and there is a fine smell of fiberglass and balsa in the valley.

The first task was to mark the new cutout on the hull and then roughly jigsaw to that mark.

A nice wide cockpit and hopefully a decent sized cabin…

And of course the family popped by for a visit…as more bits of cutout etchell get taken out of the boat shed, they are beginning to wonder if there will be any boat left in a few days!

We then cutout the front bulkhead. The plan is to add another bulkhead further along the boat and so allow room for a very small double berth that splits as it goes about a foot behind the mast.

The next particularly nasty task was to grind out the hole at the front of the boat. Nick (bless him) donned the scary suit and dove head first through the bulk head armed only with an old angle grinder and a good dust mask. So we now have a bigger hole at the front of the boat through which to do an arty shot of nick looking scary…..

so now we have even less boat….will there be any left soon i hear you say…tune in next week to find out!

Preparing the hull

•April 1, 2010 • Leave a Comment

A busy day yesterday. Finished off the cover on the boat shelter. At least it’s now properly protected and a more pleasant place to work in.

We removed all the fixings from around the cockpit and then cut out the centre console, floor supports and raised deck area.

(Nick looking very sinister)

(The new open space – roomy!)

This had opened up the space and will make it easier to start working on the cabin floor. The keelboard had a small bit of delamination and rot. After grinding back the fibreglass around that area, it seems that the damage is minimal.